It took me a while to get myself in the state of writing tech articles again. This is an old habit, so 2000s. It was in 2006 when I first start to write on a blog, but at some point I loose interest, and lost the articles. I continued to write from time to time on another passion of mine – the martial arts.
So I will try from time to time to write on the projects I’m involved and the challanges I meet every day. Hope it will be more than 2-3 articles per year but at this time, this is my target. I hope this effort will be recognized as technical contribution by Oracle ACE Program.
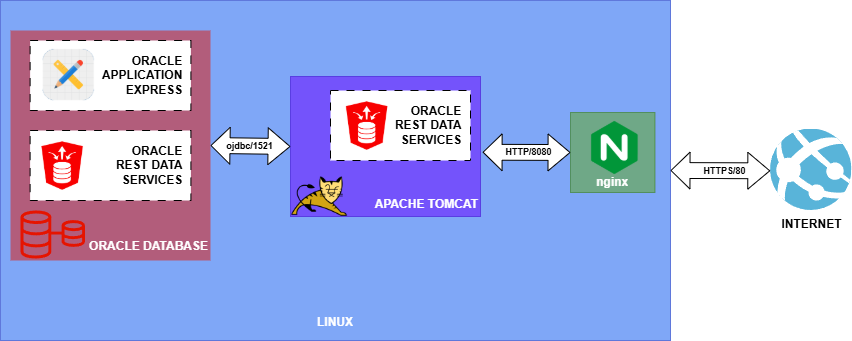
So on this first article I will describe my experience with a LANAO Setup (Linux – Apache – Nginx – APEX – ORDS – Oracle database) technology stack.
I started to use the Oracle APEX back in 2008, when I first used version 3.0 and 2.2, also knowed as HTMLDB. It was a collection of pl/sql packages in the Oracle Database that was generating HTML code. Very rudimentary in the begining, the framework took a nice turn unde Joel R. Kallman, who saw the value and the opportunity in it and transformed it like in the story of Cinderella, from the orphan child to a shining product, flagship of the low-code in the Oracle world. More on this evolution I will write probably in my first apprecition post which will be in autumn this year. But, enough with the rambles let’s get back to the initial topic.
This article is written in 2025, so at this moment LOANOA is afree of cost technology stack that is based on following technologies:
- Linux – as operating system can be used in several flavours and editions can be used starting with Oracle Enterprise Linux 7,8,9, Redhat Enterprise Linux 7,8,9 , Centos 7,8
- Oracle Database – as relational database can be used several version can be used 11g, 12c, 18c, 19c, 21c, 23ai with all the edition XE,FREE,Standart or Enterprise edition
- Apache Tomcat – as application several version 7,8,9
- Nginx – as a reverse proxy component can be used with version 1, several releases
- ORDS – Oracle Rest Data Services application can be used with following versions 17c, 18c, 19c, 20,21,22,23,24,25
- APEX – Oracle Application Express framework can be used with following versions 18c, 19c, 20,21,22,23,24,25
My setup that I follow in this article is for the following versions of products. The installation was done at the begining of May 2025, and I don’t have all the outputs of the commands, but I still have all the commands ran. So, if you are interested in this setup you can follow the steps bellow to get it! This is a long post, so thanks for reaching here and I hope you will continue to read it.
- Centos Linux release 7.6.1810 (Core)
I know this is old and EOL since last year, but when I start the setup i didn’t knew and I was pressed by a provider to move my VPS infrastructure. So I had to do it pretty quick over night and because the default image received was this version of Centos and I install everythin in that night, I stayed with it. The good thing about this operating system is that is free of cost and mature.
I know, it’s not ideal, but I managed to use it without problems. Probably pretty quick in the future I’ll have to update, but this is it for the moment. So, this is the operating system
$> cat /etc/redhat-release
In order to install you need of course to set your repos. I used the following vault repository and create /etc/yum.repos.d/CentOS-Base.repo with the following content. You will need now matter the flavor and version of Linux listed above to do the same thing, meaning the setup of repos.
[base]
name=CentOS-$releasever - Base
mirrorlist=http://vault.centos.org/?release=$releasever&arch=$basearch&repo=os&infra=$infra
baseurl=http://vault.centos.org/centos/$releasever/os/$basearch/
gpgcheck=1
gpgkey=file:///etc/pki/rpm-gpg/RPM-GPG-KEY-CentOS-7

#released updates
[updates]
name=CentOS-$releasever - Updates
mirrorlist=http://vault.centos.org/?release=$releasever&arch=$basearch&repo=updates&infra=$infra
baseurl=http://vault.centos.org/centos/$releasever/updates/$basearch/
gpgcheck=1
gpgkey=file:///etc/pki/rpm-gpg/RPM-GPG-KEY-CentOS-7

#additional packages that may be useful
[extras]
name=CentOS-$releasever - Extras
mirrorlist=http://vault.centos.org/?release=$releasever&arch=$basearch&repo=extras&infra=$infra
baseurl=http://vault.centos.org/centos/$releasever/extras/$basearch/
gpgcheck=1
gpgkey=file:///etc/pki/rpm-gpg/RPM-GPG-KEY-CentOS-7

#additional packages that extend functionality of existing packages
[centosplus]
name=CentOS-$releasever - Plus
mirrorlist=http://vault.centos.org/?release=$releasever&arch=$basearch&repo=centosplus&infra=$infra
baseurl=http://vault.centos.org/centos/$releasever/centosplus/$basearch/
gpgcheck=1
enabled=1
gpgkey=file:///etc/pki/rpm-gpg/RPM-GPG-KEY-CentOS-7This version Oracle Database 21CXE was the newest Oracle database free of cost edition that was compatible with the operating system, and still supported until 2027. In order to install it, you need to install some prerequisites packages that are easy to check and install with the pre-install package offered by Oracle. I installed the database with the root user, but I believe any sudoer will be able to do the same.
root$> wget https://yum.oracle.com/repo/OracleLinux/OL7/latest/x86_64/getPackage/oracle-database-preinstall-21c-1.0-1.el7.x86_64.rpm
root$> rpm -i  oracle-database-preinstall-21c-1.0-1.el7.x86_64.rpm
Depending on the packages installed, you may need to add other programs to your image. Some of the packages I needed to install are listed bellow:
root$> yum install bc
root$> yum install bind-utils glibc-devel ksh
root$> yum install libaio nfs-utils policycoreutils-python  psmiscsmartmontools sysstat unzip  xorg-x11-utils xorg-x11-xauth
root$> yum install  psmisc smartmontools
After all the necessary packages had been installed I’ve installed the database, with the following commands:
root$> wget https://download.oracle.com/otn-pub/otn_software/db-express/oracle-database-xe-21c-1.0-1.ol7.x86_64.rpm
root$> yum -y localinstall oracle-database-xe-21c-1.0-1.ol7.x86_64.rpm
After these commands you can reboot or not your server. I ran the following command to configure and then database should was up and running.
root$>/etc/init.d/oracle-xe-21c configureIn order to connect, use any client available and don’t forget to allow ingress on the 1521 port on the machine. The database will be available via TNS or JDBC thin string jdbc:oracle:thin:@localhost:1521/xepdb1.
3. Oracle Application Express
The best thing about Oracle APEX is that is free of cost and supported with almost any Oracle database after 19c, no matter the version and edition. So I used the last version available namely 24.2, which I downloaded and installed using oracle user following the installation guide.
oracle$> wget https://download.oracle.com/otn_software/apex/apex_24.2.zip
oracle$> unzip apex_24.2.zip

oracle$> sqlplus sys@xepdb1 as sysdba
SQL*Plus: Release 21.0.0.0.0 - Production on Thu May 29 13:21:05 2025
Version 21.3.0.0.0
Copyright (c) 1982, 2021, Oracle.  All rights reserved.
Enter password:

Connected to:
Oracle Database 21c Express Edition Release 21.0.0.0.0 - Production
Version 21.3.0.0.0

SQL>@apexins.sql APEX APEX TEMP /i/  -- here as you can see I used a dedicated tablespace for APEX
SQL>@apxchpwd.sql
SQL>ALTER USER APEX_PUBLIC_USER ACCOUNT UNLOCK;
SQL> begin
    sys.validate_apex;
    end;
    /
At this moment , the APEX framework was installed in the database, but in order to be use it needs a a gateway. And this gateway is Oracle Rest Data services, which is an Java application that runs in an application server, connects to the database via jdbc and spools out HTML code on HTTP protocol.
4. Oracle Rest Data Services
The best thing about ORDS is also that is free of cost and supported with almost any Oracle database after 19c, no matter the version and edition. So I used the last version available namely 25.1, which I downloaded and installed using oracle user following the installation guide.
oracle$>mkdir -p /home/oracle/ords/ords-25.1/config
oracle$>cd /home/oracle/ords/ords-25.1
oracle$> wget https://download.oracle.com/otn_software/java/ords/ords-25.1.0.100.1652.zip
oracle$> unzip ords-25.1.0.100.1652.zip
oracle$> ords --config /home/oracle/ords/ords-25.1/config install
At this moment, the ORDS is install in the database, it could be set to run in stand alone but I wanted to have it deployed with Apache Tomcat, an open source application server .
5. Apache Tomcat
The Apache Tomcat application server is an iconic product that has a history of 25 years and many versions. For this installation we chose version 9.0.105, which is the eldest one still supported as of May 2025, for more information you can visit the dedicated page.
But in order to use it, a supported version of Java needs to be installed on the system, so I downloaded an installed Java 17, which again is free
oracle$>wget https://download.oracle.com/java/17/archive/jdk-17.0.12_linux-x64_bin.rpm
oracle$>sudo yum -y localinstall jdk-17.0.12_linux-x64_bin.rpm
After we downloaded and unzipped the Apache Tomcat 9
oracle$>wget https://dlcdn.apache.org/tomcat/tomcat-9/v9.0.105/bin/apache-tomcat-9.0.105.zip
oracle$>unzip apache-tomcat-9.0.105.zip
There are few steps to do:
1. copy the ord web archive to the webapp directory inside tomcat
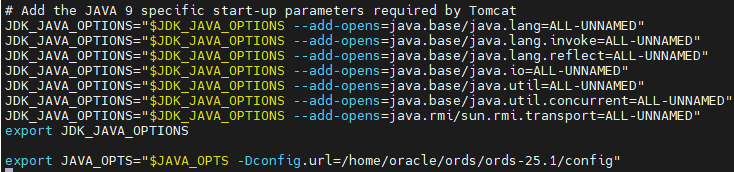
oracle$>cp /home/oracle/ords/ords-25.1/ords-25.1.0.100.1652.zip /home/oracle/apache/apache-tomcat-9.0.105/webapps/2. add a parameter to the Apache, config.url to the application server configuration, by adding the following line in the catalina.sh file export JAVA_OPTS=”$JAVA_OPTS -Dconfig.url=/home/oracle/ords/ords-25.1/config”
3. copy the images from the apex directory in the webapps/i folder
oracle$>mkdir /home/oracle/apache/apache-tomcat-9.0.105/webapps/i
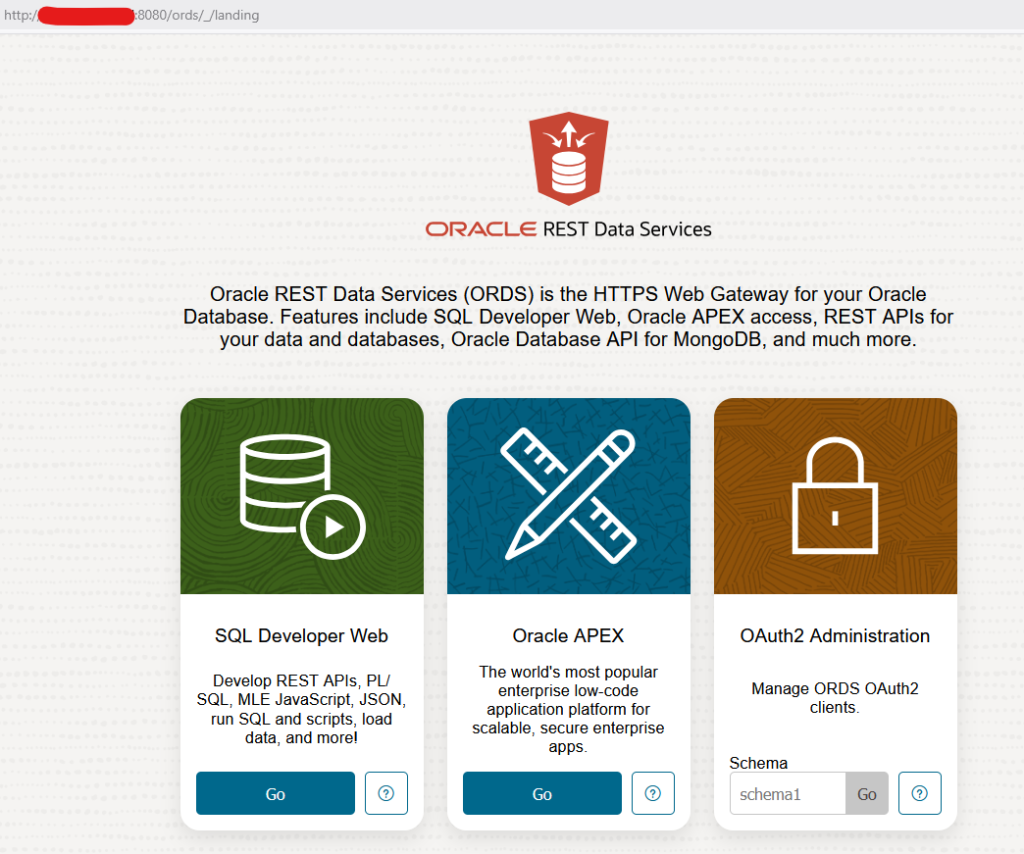
oracle$>cp -R /home/oracle/apex_24.2/images/* /home/oracle/apache/apache-tomcat-9.0.105/webapps/iat this moment, Apache Tomcat can be started and Oracla APEX can be access on the default 8080 port.
6. nginx
The last product in this configuration is the reverse proxy, and I chose nginx for the simplicity. In order to install it, the repo for it need to be add. So I created a nginx repo file and filled it with the nginx details bellow, and then I installed with sudo the package
oracle$>vi /etc/yum.repos.d/nginx.repo
...
[nginx-stable]
name=nginx stable repo
baseurl=http://nginx.org/packages/centos/$releasever/$basearch/
gpgcheck=1
enabled=1
gpgkey=https://nginx.org/keys/nginx_signing.key
module_hotfixes=true

[nginx-mainline]
name=nginx mainline repo
baseurl=http://nginx.org/packages/mainline/centos/$releasever/$basearch/
gpgcheck=1
enabled=1
gpgkey=https://nginx.org/keys/nginx_signing.key
module_hotfixes=true

oracle$> sudo yum install nginx
In order to run as a proxy, the nginx configuration file need to be modified as bellow
oracle$>vi /etc/nginx//conf.d/default.conf
...
server {
        listen 80 ssl;

        add_header Content-Security-Policy "default-src 'self'; script-src 'self' 'unsafe-inline' 'unsafe-eval'; img-src 'self' data:; style-src 'self' 'unsafe-inline'; font-src 'self'  ; connect-src 'self' http://localhost https://static.oracle.com; object-src 'none' ";

        server_tokens off;
        proxy_redirect off;
        proxy_buffering off;
        proxy_connect_timeout 600;
        proxy_send_timeout 600;
        proxy_read_timeout 600;
        proxy_pass_request_headers on;
        proxy_set_header X-Forwarded-For $proxy_add_x_forwarded_for;
        proxy_set_header X-Forwarded-Proto http;
        proxy_http_version 1.1;
        proxy_set_header X-Forwarded-User $http_authorization;
        proxy_set_header Host $host;

        location /ords/ {
                proxy_pass http://localhost:8080/ords/;
        }
        location /i/ {
                proxy_pass http://localhost:8080/i/;
        }
        }
}
After the setting is done, we can safely start the nginx server and test the LOANOA configuration
oracle$>sudo systemctl start nginx.service
If you want to use HTTPS, secured, you can generate a self signed certificate and put it in nginx
oracle$>openssl req -new -x509 -days 30 -nodes -newkey rsa:2048 -keyout server.key  -out server.crt -subj "/C=RO/ST=BUCURESTI/L=BUCURESTI/CN=$(hostname -i)"
oracle$>cp  server.key  /etc/pki/nginx/
oracle$>cp  server.crt  /etc/pki/nginx/
oracle$>vi /etc/nginx//conf.d/default.conf
...

server {
        listen 443 ssl;
        ssl_certificate "/etc/pki/nginx/server.crt";
        ssl_certificate_key "/etc/pki/nginx/private/server.key";

        add_header Content-Security-Policy "default-src 'self'; script-src 'self' 'unsafe-inline' 'unsafe-eval'; img-src 'self' data:; style-src 'self' 'unsafe-inline'; font-src 'self'  ; connect-src 'self' https://localhost https://static.oracle.com; object-src 'none' ";

        server_tokens off;

        proxy_redirect off;
        proxy_buffering off;
        proxy_connect_timeout 600;
        proxy_send_timeout 600;
        proxy_read_timeout 600;
        proxy_pass_request_headers on;
        proxy_set_header X-Forwarded-For $proxy_add_x_forwarded_for;
        proxy_set_header X-Forwarded-Proto http;
        proxy_http_version 1.1;
        proxy_set_header X-Forwarded-User $http_authorization;
        proxy_set_header Host $host;

        location /ords/ {
                proxy_pass http://localhost:8080/ords/;
        }
        location /i/ {
                proxy_pass http:/localhost:8080/i/;
        }
   }
}